Alcove Storage Ideas for Victorian Terraces: A Design-Led Guide for Period Homes
Almost every Victorian terrace has the same two gifts and the same two problems. The gifts are the chimney breast and the alcoves on either side of it. The problems are that the alcoves are awkwardly shallow, and that the walls around them are never straight. Most alcove advice on the internet ignores both of those facts. It shows a photograph of fitted shelves and says “add shelving”, as though the shelves were the decision. They are not. The decision is what the alcove is for, how the joinery meets a crooked plaster wall, and what happens to the picture rail, the skirting and the cornice when you build into the space.
This guide is written for the homeowner, not the joiner. It starts with the real dimensions of a Victorian alcove, then works through the five layouts that actually suit these rooms, with the room each one suits best. Then it covers the period details that decide whether fitted joinery looks like it has always belonged there or looks like a box pushed into a corner. Then paint and finish, the mistakes to avoid, and what fitted alcove joinery costs in the UK, honestly, without invented numbers.
The advice here is specific to Victorian and Edwardian terraces: houses with chimney breasts, picture rails, deep skirting, cornices and solid brick walls. If your house has none of those, a generic small home storage guide will serve you better. If it has all of them, read on.
Measure the Alcove First: The Dimensions That Decide Everything
Before you choose a layout, a finish or a joiner, measure the alcove properly. Most alcove projects go wrong at this stage, not at the fitting stage, because the owner measured the width at one height and assumed it was the same at every height. In a Victorian terrace it almost never is.
A typical alcove in a Victorian terrace is 80 to 120 cm wide and 30 to 40 cm deep. Some guides give the same measurement in millimetres, 900 to 1,100 mm wide and 300 to 350 mm deep, which is the same range in the middle of the scale. Your alcove may sit outside that range, especially in a larger double-fronted house or in a room where the chimney breast is unusually wide, so measure yours rather than trusting the typical figure.
Measure the width at three heights: at skirting level, at waist height and at picture rail height. Write all three numbers down. In most Victorian rooms they will differ by a centimetre or two, sometimes more, because the plaster was applied by hand and the wall has moved slightly over a hundred years. Also measure the depth at the top and the bottom, and check whether the two side walls are parallel. They often are not. A good joiner will ask for these measurements or take them himself, and a joiner who does not ask should make you cautious.
Shelf depth matters more than most people expect. A shelf 20 to 25 cm deep is enough for books, storage boxes, jars and most ornaments, and it leaves the front of the alcove clear so the room still reads as a room rather than a cupboard. Deeper shelves, 30 cm or more, suit the bottom shelf of a media alcove or a shelf that holds box files and large storage boxes, but deep shelves at eye level make the alcove feel heavy and make the things at the back hard to reach. The full depth of the alcove, 30 to 40 cm, belongs to cupboards and drawers, not to open shelves.
Height matters too. Measure from the floor to the picture rail, and from the picture rail to the ceiling, and note where the cornice starts. These two measurements decide the picture rail question, which is covered below, and they decide whether shelves can run to the ceiling or should stop below the cornice. Measure the skirting height as well, because the bottom cupboard or the lowest shelf needs to sit above it or be scribed around it, and that is a decision, not an afterthought.
Finally, measure what the alcove has to hold. Count the books, measure the television or the boxes, and check the height of the tallest item that will sit on a shelf. A shelf spacing of 28 to 32 cm suits most books, including paperbacks and the taller hardbacks, and a spacing of 35 to 40 cm suits box files and storage boxes. Adjustable shelves are worth asking for, because the things you store will change over the years and fixed shelves cannot change with them.
The Five Layouts: Which Alcove Does What
There are five layouts that work in Victorian alcoves, and each one suits a different room and a different kind of storage. Choosing between them is the main design decision in the whole project. Everything else, the paint, the handles, the lighting, follows from it.
Layout 1: Low Cupboards with Shelves Above
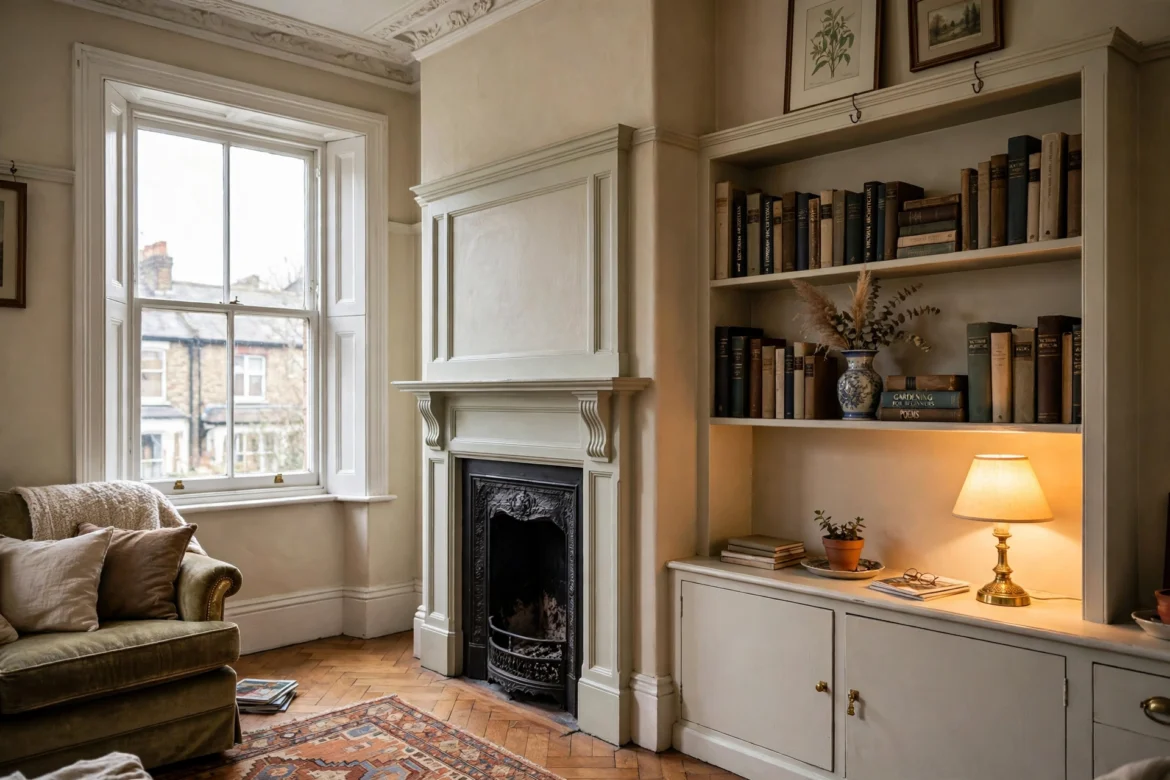
Low cupboards with open shelves above them is the most common alcove layout in Victorian terraces, and for good reason. It is the most flexible. The cupboards hide the things you do not want to see, the cables, the board games, the cleaning products, the files, the children’s toys, and the shelves above display the things you do want to see, the books, the pictures, the ceramics. It suits a living room alcove better than any other layout, because a living room needs both kinds of storage at once.
The usual proportion is cupboards up to about 70 to 90 cm high, which is roughly the height of a sideboard, with shelves above from the top of the cupboards to just under the cornice. That gives you a generous run of closed storage without the alcove reading as a wardrobe, and a tall run of display that draws the eye upwards and makes the chimney breast look taller. If the cupboards are deeper than the shelves, the step between them creates a small ledge, which is a useful place for a lamp or a framed photograph, and it also makes the shelves look deliberate rather than accidental.
Ask for the cupboard doors to be plain and flat, or with a simple Shaker-style frame, and for the handles to be small and quiet, a knob or a cup pull in brass or black, rather than a long bar handle that fights the period detail. Inside, ask for one adjustable shelf per cupboard and, if the budget allows, a shallow drawer at the top of each cupboard for the small things that otherwise end up loose. A drawer 10 to 12 cm deep holds remote controls, chargers, candles and the oddments that make a living room untidy.
This layout also suits a dining room alcove, where the cupboards hold table linen, placemats and the things used at the table, and the shelves hold glasses, books and a few pieces you like looking at. In a dining room, keep the top shelf lower than you would in a living room, so the things on it can be reached without a chair.
Layout 2: Full-Height Cupboards, the Bedroom Alcove Wardrobe
Full-height cupboards suit a bedroom alcove, where the job is hanging clothes and storing folded things out of sight. A bedroom alcove 80 to 120 cm wide holds a useful amount of hanging space, roughly the width of a single wardrobe, and two alcoves either side of the chimney breast hold the equivalent of a double wardrobe, which is often enough for a main bedroom in a terrace.
The inside of a bedroom alcove wardrobe needs a hanging rail, at least one shelf above it and, if the alcove is deep enough, a set of drawers or a shelf stack at the bottom. A rail at about 170 cm from the floor suits long hanging space for dresses and coats, and a rail at about 100 cm suits shirts and folded trousers. If the alcove is tall enough, a double hanging arrangement, one rail high and one rail low, doubles the capacity and suits a room where two people share the wardrobe. The shelf above the rail holds the things used least often, out of season clothes, spare bedding and suitcases.
Doors matter more here than in a living room, because they are larger and more visible. Plain flat doors painted the same colour as the walls make the wardrobe disappear into the room, which is usually what you want in a small bedroom. Mirror doors make the room feel bigger, but they change the character of a period room and they show every fingerprint, so they are worth thinking about twice. If the alcove is in a room where you dress, a full-length mirror on the inside of one door is a better compromise than a mirrored front.
Our guide to Scandinavian bedroom ideas UK explains how pale, calm bedrooms work in small period rooms, and the same thinking applies to alcove wardrobes: keep the doors quiet, keep the handles small, and let the bedding and the light do the talking. For colour in a small bedroom, our guide to bedroom colour schemes for small bedrooms covers the palettes that make a room with fitted wardrobes feel larger rather than smaller.
Ventilation matters in a bedroom alcove wardrobe. Clothes in a closed cupboard against a solid brick external wall can pick up a musty smell if the air cannot move, so leave a small gap behind the units, as explained in the period details section below, and do not pack the wardrobe so tightly that air cannot circulate. A wardrobe that smells of damp is a ventilation problem, not a clothes problem.
Layout 3: Shelves Only, the Home Library
Shelves only, from floor to ceiling or from a low plinth to the cornice, turns an alcove into a home library. It suits a living room or a study where the owner has enough books to fill it, and it suits a room where the chimney breast is the natural centre of attention and the alcoves should frame it rather than compete with it. A full run of books either side of a fireplace is one of the most satisfying sights in a Victorian terrace, and it is also one of the cheapest alcove treatments, because there are no doors, no hinges and no drawers to pay for.
The risk with shelves only is clutter. Books look good when they fill a shelf in a single run, with a little space at the end, and they look untidy when they are mixed with too many ornaments, photographs and objects. The rule that works is to keep at least a third of each shelf for books alone, to group similar books together, and to leave one shelf in three partly empty, so the eye has somewhere to rest. A shelf that is full to the brim on every level reads as storage. A shelf with breathing room reads as a library.
Shelf spacing for books is 28 to 32 cm, as above, but a library alcove benefits from one or two taller gaps for oversized books, art books and box sets. Ask the joiner to make two or three shelves adjustable, so you can change the spacing when the collection changes. Fixed shelves at a single spacing force you to lay tall books flat, which wastes space and looks untidy.
Lighting makes a library alcove. A small picture light above the top shelf, or a pair of LED strips hidden under the shelf above eye level, turns the books into a feature in the evening and stops the alcove from going dark. If you are fitting lights, ask for them to be wired on the same circuit as the room lights with a separate switch or a dimmer, rather than a plug-in strip with a visible cable.
Layout 4: A Desk in the Alcove, the Small Home Office
A desk fitted into an alcove makes a convincing small home office, and it suits a spare bedroom, a living room corner or a landing where a full desk would take up too much floor. The alcove gives the desk three walls, which makes it feel enclosed and focused, and it keeps the working mess out of the main sightlines of the room.
The desk top should sit at 72 to 75 cm high, which is standard desk height, and it should run the full width of the alcove, so there is no wasted gap at either side. A depth of 50 to 60 cm gives enough room for a laptop or a monitor, a keyboard and a notebook, but the alcove itself is only 30 to 40 cm deep, so a desk in an alcove usually needs the desktop to project slightly beyond the face of the chimney breast, or the alcove to be deepened by building the desk out from the wall. That projection is the main thing to check before you commit, because a desk that sticks out 20 cm into the room changes how the room is walked through. Measure the walkway past the desk once it is in place, and make sure there is still at least 60 cm of clear passage.
Shelves above the desk hold the reference books, the files and the stationery, and they should sit at least 50 cm above the desktop, so there is room to sit and work without bumping your head. A shallow shelf 15 to 20 cm deep is enough for books and files, and it keeps the working area feeling open. Plan the sockets and the cables before the joinery is built, not after. A desk alcove needs at least two double sockets, one for the computer and one for a lamp and a charger, and a cable route down to the floor that does not leave a tangle of wires visible. The simplest solution is a small cable tray or a hole in the desktop with a grommet, and a socket fitted inside a low cupboard below the desk if there is one.
A desk alcove suits a room that is used for working in the daytime and something else in the evening. A pair of low cupboard doors below the desk, or a single drawer unit on castors that slides underneath, lets you close the working day away. Without that, the desk stays a desk all evening, and the room never quite relaxes.
Layout 5: The TV and Media Alcove
A television in one alcove, with the other alcove for storage, is a common arrangement in Victorian living rooms, and it works well when it is planned rather than improvised. The alcove gives the television a frame, which stops it from dominating the room, and it hides the boxes, the speakers and the cables that come with it.
The main rule for a media alcove is ventilation. A television, a set-top box, a games console and a soundbar all produce heat, and an alcove is an enclosed space, so the heat has nowhere to go. Leave a gap of at least 5 cm behind the television and around the boxes, leave the back of any cupboard open or vented, and do not push the television flush against the wall. A television that overheats will fail early, and a set-top box in a sealed cupboard will restart itself on warm evenings. If the alcove is being built as a media unit, ask the joiner to leave ventilation slots in the back panel and to fit the boxes on open shelves rather than behind closed doors, or behind doors with a vent.
The second rule is to plan the cables. A media alcove needs power for the television and each box, and it needs the cables routed out of sight. The tidy way is a cable channel cut into the back of the unit, with the sockets fitted inside the alcove, and a brush plate or a small hole where the cables pass through a shelf. The untidy way, which is what most people end up with, is a power strip on the floor and cables draped over the shelf edge. Decide before the joinery is built, because adding a socket afterwards means cutting into finished paintwork.
The third rule is height. The centre of the television screen should sit at about seated eye level, roughly 100 to 110 cm from the floor for a sofa, and the television should be centred in the alcove, not pushed to one side. A television mounted too high, which is common when the alcove is tall, is uncomfortable to watch and makes the room feel like a waiting room. If the alcove is much taller than the television, fill the space above it with a shelf or two, so the television sits in the lower two thirds of the alcove and the upper third is display.
Use the other alcove for the things that support the television: the books, the records, the board games and the storage boxes. A living room with one media alcove and one storage alcove feels balanced, and the chimney breast between them becomes the centre of the room again, which is how the room was designed to work.
The Period Details Nobody Should Skip
Fitted joinery in a Victorian terrace either looks like it has always been there, or it looks like a flat-pack that was pushed into a corner. The difference is almost entirely in the period details, and they are all decisions to make before the joiner starts, not adjustments to make afterwards.
The first detail is scribing. Victorian walls are almost never flat, straight or identical from one side of the alcove to the other. A joiner who builds a square box and pushes it into the alcove will leave a gap at one side and a tight fit at the other, and the gap will show as a dark line that catches the eye. The right approach is scribing, which means cutting the edge of the joinery to follow the shape of the wall, so the unit meets the plaster all the way down. Scribing takes longer and costs more, because it is skilled hand work, but it is the single biggest difference between joinery that looks fitted and joinery that looks placed. Ask your joiner whether the price includes scribing, and be cautious of a quote that does not mention it.
The second detail is the picture rail. Most Victorian rooms have a picture rail at about 1.8 to 2 metres from the floor, and it runs across the alcove as well as across the main walls. When you build into the alcove, you have three choices, and each one is defensible. You can work around it, which means stopping the joinery below the rail and leaving the rail visible, which suits shelves that end at the rail. You can box over it, which means running the joinery past it and hiding it, which suits full-height cupboards. Or you can remove it in the alcove and reinstate it on the face of the new joinery, which keeps the line of the rail continuous across the room. What you should not do is cut the rail short without a plan, or leave a stub of rail floating at the edge of the unit, because that reads as a mistake. Decide the picture rail question before the joinery is ordered, and make sure the joiner knows the decision.
The third detail is the skirting board. Victorian skirting is usually deep, 15 to 20 cm tall, and it runs into the alcove. The bottom of the joinery has to deal with it. The tidy solutions are to scribe the unit around the skirting, to remove the skirting inside the alcove and run a matching piece across the front of the unit, or to build the unit on a plinth that sits in front of the skirting. Removing the skirting inside the alcove and reinstating it on the unit front is the neatest result, but it means the skirting is no longer original in that spot, so it is worth agreeing with the joiner in advance. Do not let the unit sit on top of the skirting with a gap underneath, because the gap will collect dust and look unfinished.
The fourth detail is the cornice. If the shelves run to the ceiling, they will meet the cornice, and the cornice will either be cut into or worked around. The best result is to stop the shelves 50 to 75 mm below the cornice, so the moulding still reads as a continuous line across the room. Stopping short also avoids the problem of cutting a plaster cornice, which is difficult to repair and easy to damage. If the room has no cornice, or the cornice is a simple modern replacement, the shelves can run to the ceiling, but the gap is still worth keeping for the shadow line it creates.
The fifth detail is damp and ventilation, and it is the one with real consequences if it is ignored. Check a blocked chimney breast for damp before fitting anything against it. A chimney that was blocked without a vent can hold moisture, and fitting joinery over it traps that moisture against the wall. Look for staining, flaking paint, a musty smell or plaster that sounds hollow when tapped. If any of those are present, get the chimney checked and vented before the joinery goes in, not after. The same applies to external solid brick walls. A Victorian terrace has solid brick walls with no cavity, and those walls need to breathe. Leave a small gap, a centimetre or two, behind any unit fitted against an external wall, so air can move and the wall can dry. Do not seal joinery hard against an external wall, and do not fill the gap with expanding foam, which traps moisture rather than letting it escape.
The sixth detail is the floor. Victorian floors are often uneven, and a unit built to sit on the floor will rock or leave a gap if the floor slopes. A small plinth at the bottom of the unit hides the unevenness and gives the joiner something to level against. The plinth should be set back slightly from the face of the unit, so it reads as a shadow gap rather than a visible strip, and it should be painted the same colour as the unit.
Paint and Finish: Make the Joinery Disappear or Make It the Feature
Paint is the decision that decides whether alcove joinery disappears into the room or becomes the feature of it, and there is a right answer for most Victorian terraces. Paint the joinery the same colour as the walls, in eggshell or satin, and it recedes. The alcove stops reading as furniture and starts reading as architecture, and the room feels larger because there is no visual break where the wall ends and the unit begins. This is the right choice for a small living room, a small bedroom or any room where the alcove is one of several things competing for attention.
The same colour does not mean the same tin of paint. Walls are usually painted in matt emulsion, and joinery needs a harder finish, so use an eggshell or satin wood paint in the same colour, matched by the paint shop rather than guessed by eye. The sheen difference is barely visible at a normal distance, and the harder finish survives being opened, closed and dusted far better than emulsion. Use one colour for the painted joinery across the whole ground floor, so the alcove cupboards, the doors and the skirting all belong to the same family, and the house feels coherent from room to room.
The alternative is to make the joinery the feature, by painting it a contrasting colour, a deep green, a dark blue or a warm charcoal, while the walls stay pale. This works in a larger room with good light, and it works when the joinery is the main thing in the room, for example a library wall or a pair of full-height bedroom cupboards. It fails in a small or dark room, where a dark alcove unit makes the room feel smaller and heavier, and it fails when the contrast colour is chosen from a photograph rather than tested on the wall. If you are tempted by a contrasting colour, paint a large test patch, at least a metre square, on the alcove wall and live with it for a week, in daylight and in the evening, before committing.
The finish of the shelves themselves matters as much as their colour. Painted shelves in eggshell or satin are easy to clean and they do not show the marks that books and boxes leave. Bare wood shelves look warmer, but they mark more easily and they need a hardwax oil or a varnish to survive. If you choose wood, use a hardwood or a good quality veneered board, not plain MDF with a raw edge, because the edge will chip and the shelf will sag over time under the weight of books. A shelf 25 mm thick in a good quality board will carry books without sagging across an alcove width of 80 to 120 cm, and it is worth confirming the thickness with the joiner rather than assuming it.
Handles are the jewellery of the unit, and they should be chosen last, after the paint is decided. A knob in aged brass, a cup pull in blackened steel or a simple wooden knob suits a Victorian room. A long bar handle in polished chrome suits a modern kitchen, and it will fight the picture rail, the cornice and the fireplace in a period room. If the budget is tight, spend the money on the paint and the hinges, and fit simple knobs, because a good hinge that closes softly is noticed every day and a handle is noticed only when you look for it.
Our guide to paint colours that make a small room look bigger explains undertones and light reflectance in plain English, and the same rules apply to alcove paint. A north-facing alcove takes warm colours well and makes cool colours look grey, and a south-facing alcove takes cooler colours without them looking cold. Test the colour in the alcove itself, not on the main wall, because the alcove is in shadow for much of the day and a colour that looks right on the chimney breast can look wrong inside the recess.
What NOT to Do in a Victorian Alcove
Some alcove mistakes are expensive, and some are just disappointing, but they are all avoidable, and most of them come from treating the alcove like a flat wall rather than a period feature.
Do not fit a standard flat-pack wardrobe or bookcase into an alcove and call it fitted. A flat-pack unit is built square, it is built to a standard depth that rarely matches the alcove, and it leaves gaps at the sides and the top that fill with dust and catch the eye. The gap at the top is the worst, because it is at eye level from across the room and it reads as a shelf for dust. If the budget does not run to bespoke joinery, a better compromise is a freestanding piece of furniture that fits the alcove loosely and can be moved, rather than a flat-pack forced into a space it was not made for.
Do not run the shelves to the ceiling without a plan for the cornice and the picture rail. The cornice will be cut into, the rail will be interrupted, and the result will look like the joinery arrived after the room was finished, which it did, but it should not look that way. Stop the shelves below the cornice, decide the picture rail question in advance, and the joinery will look like it belongs.
Do not ignore the chimney. A blocked chimney without a vent, a damp patch behind a fitted unit, or a unit sealed hard against a solid brick wall are the three damp mistakes that cost real money to fix, because the unit has to come out before the wall can be dried. Check the chimney, ventilate it, leave a gap behind the units, and the problem never arises.
Do not overfill the shelves. An alcove shelf that is packed edge to edge with books, boxes and ornaments reads as a storage cupboard with the doors missing. Keep a third of each shelf empty, group similar things together, and take one thing off every shelf before you add something new. The same rule applies to cupboard tops: a lamp and a photograph are styling, and five objects are clutter.
Do not put a television in an alcove without ventilation and a cable plan. The heat will shorten the life of the television and the boxes, the cables will show, and the alcove will become the one untidy corner in an otherwise tidy room. Ventilation slots and a cable channel are cheap when they are planned, and expensive when they are added afterwards.
Do not use the alcove as the place for the things that belong nowhere else. An alcove is not a dumping ground for the ironing board, the vacuum cleaner and the box of cables, and using it that way wastes the best storage in the room. Give the awkward things a proper home, under the stairs or in a cupboard, and keep the alcove for the things the room is actually used for.
Do not paint the inside of the alcove a different colour from the rest of the room without thinking about it. A dark back panel behind open shelves can look striking in a photograph, and it can also make the alcove feel like a hole in the wall. In a north-facing room or a small room, a dark back panel will swallow the light, and the books on the shelves will be hard to see. If you want contrast, put it on the joinery fronts, not on the wall behind the shelves.
Beyond the Living Room: The Same Idea Through the House
The alcove is the most visible example of a pattern that runs through the whole Victorian terrace. The house is full of shallow, awkward spaces that were designed for a different way of living, and the same fitted thinking that works in the alcove works in all of them.
Under the stairs is the best example. The space under a Victorian staircase is deep at one end and shallow at the other, which makes it useless for freestanding furniture and ideal for fitted drawers and cupboards. A run of drawers that follows the slope of the stairs holds shoes, coats, cleaning products and the things that otherwise live in the hall, and a cupboard at the deep end holds the vacuum cleaner and the ironing board. The same scribing and ventilation rules apply, and the same paint rule, one colour for all the joinery in the house, keeps the hall coherent.
A bay window seat with lift-up storage is the second example. A Victorian bay window usually has a low sill and a deep recess, which is the right shape for a window seat with storage underneath. The seat gives the room a place to sit and read, the storage underneath holds the blankets, the books and the children’s toys, and the whole thing is built to the shape of the bay, which freestanding furniture cannot do. Measure the bay carefully, because bay windows are rarely symmetrical, and scribe the seat to the walls.
A hallway shelf 15 cm deep above a radiator is the third example, and it is the cheapest of the three. A shallow shelf above a hallway radiator holds the post, the keys and the small things that otherwise end up on the floor, and it costs very little because it is a single board with two brackets. The depth matters: 15 cm is enough for letters and keys, and it does not project far enough into the hall to catch a shoulder. Deeper shelves in a narrow hall are a mistake, because the hall is a passage, not a room, and anything that narrows it further makes the house feel smaller.
The same fitted approach works in a kitchen, where the alcoves beside a chimney breast or a range cooker can hold open shelving for crockery and closed cupboards for the things that do not need to be seen. Our guide to kitchen interior design ideas on a budget UK covers the design order for a kitchen makeover, layout first, then colour, then finishes, and the same order applies to kitchen alcoves: decide what the alcove holds, then choose the colour, then the finish.
What Fitted Alcove Joinery Costs in the UK
No honest guide can give you a price table for bespoke alcove joinery, because there is no standard product to price. Every alcove is a different width, a different depth and a different wall, and every joiner prices the job after a survey. The guides that publish a single figure for fitted alcove units are either quoting a single job or inventing a number, and this guide does neither. What follows is how the price is built, so you can judge a quote when you get one.
Fitted joinery is priced per job after a survey, and the price is driven by the size of the alcove, the materials, the complexity of the fitting and where you live. A pair of alcoves in a living room costs more than a single alcove, because there is twice the material and twice the fitting, even though the design is the same. Painted MDF is the most common material and the most affordable, because it paints well and it is stable, and hardwood costs more, because the material costs more and it is harder to work. Drawers cost more than shelves, because they need runners, boxes and fronts, and a cupboard with drawers inside costs more than a cupboard with shelves inside.
Scribing is a cost driver, because it is skilled hand work that takes time, and a quote that includes scribing will be higher than a quote that does not. That is not a reason to choose the cheaper quote. A unit that is not scribed will leave gaps, and the gaps will be visible for as long as the unit is in the room. London and the South East cost more than the rest of the country, because labour costs more, and a job that needs the chimney vented, the skirting reinstated or the cornice worked around will cost more than a job in a room where none of those apply.
Get three quotes, and make sure all three are quoting the same thing. Write down the layout, the materials, the paint, the handles, the shelves, the drawers, the scribing and the ventilation, and give the same list to each joiner. A quote that is much cheaper than the other two is usually quoting less, not charging less, and the difference will appear later as an extra, a gap or a finish that was not included. Ask each joiner how long the job will take, what happens to the dust, and whether the price includes painting, because a joiner who fits and a decorator who paints are two different trades, and the painting is often the part that is forgotten in the quote.
If the budget does not run to fitted joinery in both alcoves, fit one alcove properly and leave the other empty for now, rather than fitting both cheaply. A single well-fitted alcove with a matching empty alcove looks deliberate, and the second alcove can be fitted later to the same design. Two poorly fitted alcoves look like a mistake, and they cannot be fixed without starting again.
Frequently Asked Questions
How deep should alcove shelves be in a Victorian terrace?
A shelf 20 to 25 cm deep is enough for books, storage boxes, jars and most ornaments. The alcove itself is usually 30 to 40 cm deep, but the full depth belongs to cupboards and drawers, not to open shelves. Deeper shelves at eye level make the alcove feel heavy and make the things at the back hard to reach. Use the deeper shelf only at the bottom, for box files and large storage boxes.
Should I paint alcove cupboards the same colour as the walls?
Yes, in most rooms. Painted the same colour as the walls in eggshell or satin, the joinery recedes and the room feels larger. Use one colour for the painted joinery across the whole ground floor, so the alcove cupboards, the doors and the skirting belong to the same family. A contrasting colour works only in a larger room with good light, and it should be tested as a large patch in the alcove itself before you commit.
What do I do about the picture rail when fitting alcove units?
Decide before the joinery is ordered. You can work around it by stopping the joinery below the rail, box over it by running the joinery past it, or remove it in the alcove and reinstate it on the face of the new joinery so the line stays continuous. What you should not do is cut the rail short without a plan or leave a stub of rail floating at the edge of the unit.
Can I put a TV in a Victorian alcove?
Yes, if you plan the ventilation and the cables. Leave at least 5 cm behind the television and around the boxes, leave the back of any cupboard open or vented, and do not push the television flush against the wall. Plan the sockets and the cable route before the joinery is built, and centre the television at about seated eye level, roughly 100 to 110 cm from the floor. Use the other alcove for storage, so the chimney breast stays the centre of the room.
How do I stop damp behind fitted alcove cupboards?
Check a blocked chimney for damp and make sure it is vented before fitting anything against it. Look for staining, flaking paint, a musty smell or plaster that sounds hollow when tapped. Leave a small gap, a centimetre or two, behind any unit fitted against an external solid brick wall, so air can move and the wall can breathe. Do not seal joinery hard against an external wall and do not fill the gap with expanding foam.
Is fitted alcove storage worth it in a small Victorian terrace?
In most cases, yes, because the alcove is the only storage in the room that does not take up floor space. A pair of alcoves fitted with low cupboards and shelves above holds as much as a large sideboard and a bookcase, without using any floor area at all. The value is in the layout, not the joinery itself, so choose the layout for the room first, and fit one alcove properly rather than both cheaply if the budget is tight.