Kitchen Interior Design Ideas on a Budget UK: A Design-Led Guide for Real British Kitchens
Most budget kitchen advice on the internet is not really about design. It is about renovation prices: how much a new kitchen costs, which supplier is cheapest, and how to haggle with a fitter. That is useful if you are buying a whole new kitchen. It is no use at all if your kitchen is structurally fine and you want it to look and feel designed without spending twelve thousand pounds.
This guide is the other kind. It is design-led, which means it starts with the decisions that change how a kitchen looks and works, and only then talks about money. The order matters. Layout first, then colour, then finishes, then lighting and storage, then styling. Get that order right and a modest spend goes a very long way in a real British kitchen: a galley kitchen in a Victorian terrace, an L-shape in a 1930s semi, or a small kitchen-diner in a new-build flat.
Every idea below carries a budget band, so you can pick by what you can spend rather than by what looks good in a photograph. The bands are 0 to 100 pounds, 100 to 500 pounds, and 500 to 2,000 pounds. The price figures quoted are typical ranges from UK budget kitchen guides, not our own survey, and they are framed as ranges because real prices depend on the size of the room and where you live.
The Design Order: Layout First, Colour Second, Finishes Third
A kitchen that looks wrong is almost never fixed by a new colour alone. It is usually fixed by a layout decision, then a colour decision, then a finish decision, in that order. People who start with paint and end up disappointed have almost always skipped the first step.
Layout means where the sink, the oven, the fridge and the worktop runs sit, and whether the person cooking can move between them without crossing the room. In most British kitchens the layout is already sensible, because it was set when the house was built or when the last kitchen was fitted. If the sink is under the window, the oven is in a sensible run, and there is a clear stretch of worktop for preparing food, the layout is doing its job. Leave it alone.
Colour comes second because it is the cheapest way to change the feel of the room. A kitchen painted in the wrong white, or in a colour that fights the light coming through the window, will look tired whatever you spend on handles and taps. Colour is also where small kitchens are won or lost: the right palette makes a galley kitchen feel wider, and the wrong one makes it feel like a corridor.
Finishes come third: worktops, splashbacks, flooring, handles and taps. These are the surfaces you touch and see at close range, so they carry more visual weight than their cost suggests. A new worktop on old cabinets, or new handles on painted doors, can read as a new kitchen at a tenth of the price.
Lighting and storage come after finishes, and styling comes last. Styling is the layer of bowls, boards, plants and pictures, and it only works when the layers underneath it are right. Put a beautiful chopping board in a badly lit kitchen with clashing cabinet colours and it just looks like a beautiful chopping board in a badly lit kitchen.
Keep the Layout: The Single Biggest Saving
The most expensive sentence in any kitchen project is “while we are at it, let us move the sink”. Moving a sink, an oven, a hob or a gas point means moving water, waste, gas and electrics. UK budget guides typically put that work at roughly 1,500 to 4,000 pounds on top of everything else, before a single cabinet is bought. It also means the kitchen is out of action for longer, and it usually means a plasterer and a decorator afterwards.
Keeping the layout is also the biggest single saving. Guides that compare a cosmetic makeover with a full renovation put the difference at roughly 3,000 to 5,000 pounds saved by keeping the layout and reusing the appliances that still work. That is not a small sum. It is the whole budget for a design-led makeover, several times over.
There are only two good reasons to move things. The first is a layout that genuinely does not work: a fridge door that blocks the only walkway, an oven next to a door that swings into it, or a sink with no worktop beside it for draining. The second is a structural change, such as knocking through to make a kitchen-diner. If neither applies, keep the layout and spend the money on what you can see.
Check the working triangle in your own kitchen before you decide. Stand at the sink, then walk to the hob, then to the fridge. Each leg should feel like a step or two, not a walk across the room. There should be at least 60 cm of clear worktop beside the hob for hot pans, and a clear stretch of at least 90 cm somewhere for preparing food. If those two things are true, the layout is fine and the money is better spent elsewhere.
Reusing appliances is part of the same logic. A working oven, fridge and dishwasher that are a few years old do not need replacing because the kitchen is being redesigned. Clean them properly, and if the oven has a scratched fascia or the fridge has a dented door, a matching panel or a simple cover is cheaper than a new appliance. Spend the appliance money only on the one item that genuinely fails.
What a Budget Kitchen Costs in the UK: Honest Budget Bands
Kitchen prices are quoted so widely that the numbers lose meaning. To keep this guide honest, here are the bands as UK budget guides typically describe them, and what each band actually buys.
A cosmetic makeover, roughly 3,000 to 8,000 pounds, covers painting or replacing cabinet doors, a new worktop, new handles and taps, new lighting, a splashback and new flooring, with the layout and the appliances kept. This is the band this guide is written for, and most of the ideas below sit well under the bottom of it.
A modest renovation, roughly 5,000 to 8,000 pounds, is a makeover plus one or two bigger items: a new sink and tap set, a replacement oven or hob, or a tiled floor laid by a professional. The ranges overlap because a makeover with a stone-effect worktop and a renovation with budget materials can cost the same.
A full fitted kitchen, 12,000 pounds and upwards once labour and worktops are added, means new carcasses, new appliances, new plumbing and electrics, and usually new flooring and decoration. That is a different project from this guide, and the figures are quoted here so you can recognise the difference, not so you can plan one.
Inside the makeover band, this guide uses three smaller bands per idea: 0 to 100 pounds, 100 to 500 pounds, and 500 to 2,000 pounds. A 0 to 100 pound idea should be doable in a weekend with materials from a high-street DIY store. A 100 to 500 pound idea is a focused change, such as painting all the cabinets or replacing the worktop in a small kitchen. A 500 to 2,000 pound idea is the biggest single change, such as a professional spray finish or a new worktop through the whole room.
If you are weighing a full renovation against a makeover, our guide to kitchen renovation costs in the UK gives the full fitted figures in detail. This guide stays on the design side of the line.
Cabinet Colour and Finish: Paint, Replace Doors, or Go Two-Tone
Cabinets are the largest coloured surface in a kitchen, so their colour decides the character of the room more than anything else you buy. There are three ways to change them, and the right choice depends on the condition of what you have.
Painting the cabinets is the cheapest real transformation, and it suits cabinets that are structurally sound but dated in colour. The work is mostly preparation: clean every door with sugar soap, sand lightly, prime with a primer made for melamine or laminate, and paint with a kitchen paint in eggshell or satin. Two thin coats beat one thick coat, and a small foam roller gives a smoother finish than a brush on flat doors. Budget 100 to 500 pounds for paint, primer, brushes and rollers for an average kitchen, plus a weekend of work. A professional spray finish costs roughly 500 to 2,000 pounds and gives a factory-smooth result, which is worth paying for if the cabinets are the main feature of the room.
Replacing the doors only is the middle option, and it works when the carcasses are sound but the doors are damaged, warped or a style you dislike. Standard UK cabinet widths of 500 and 600 mm mean replacement doors from high-street suppliers fit most carcasses without modification. Typical prices quoted are roughly 55 to 95 pounds per door, so a small kitchen with ten doors can be transformed for under a thousand pounds, and the carcasses, hinges and handles stay where they are. Measure every door before ordering, because a door that is 5 mm out will not close properly.
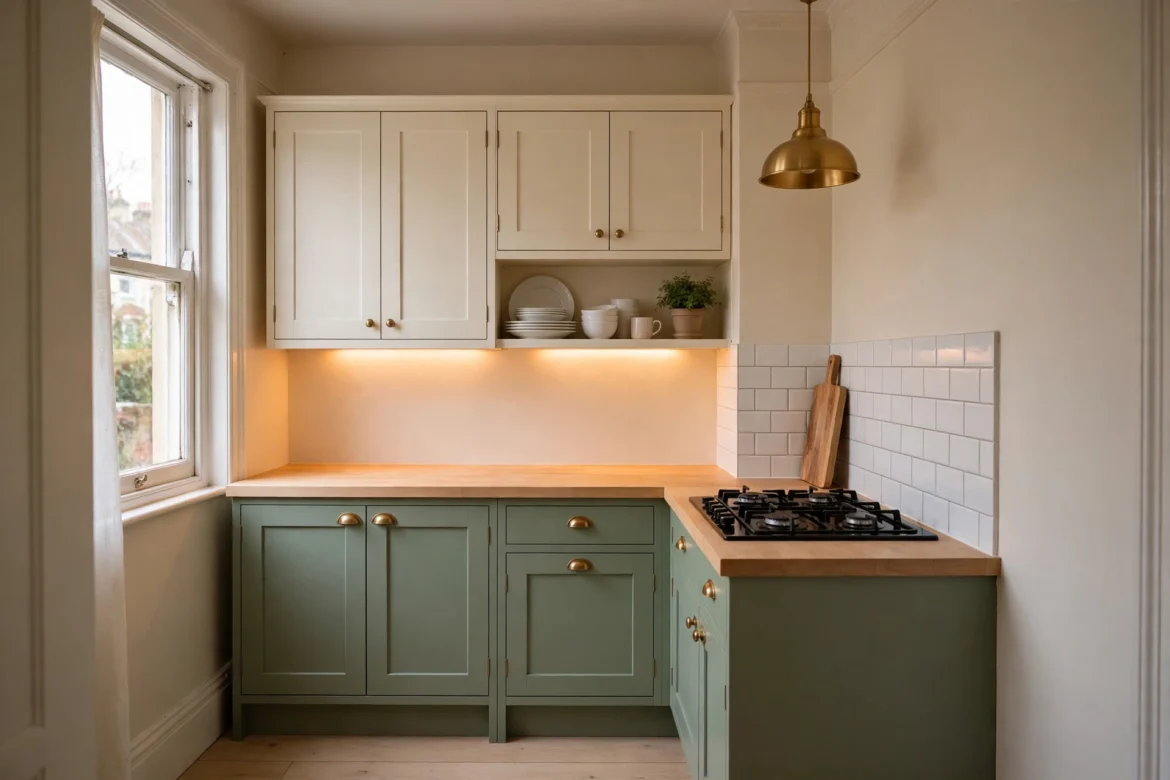
Two-tone cabinets are the design choice that makes a budget kitchen look deliberate rather than patched. The usual rule is darker on the base units and lighter on the wall units: a deep blue, sage green or charcoal base with warm white or pale grey wall units. The dark base grounds the room and hides scuffs at floor level, while the pale wall units keep the upper half of the room light. The same trick works in reverse in a very dark kitchen, with pale bases and a single darker run, such as a tall larder unit, as the accent. Pick the two colours from the same family, with the same undertone, so they look like a pair rather than two separate decisions.
Colour choice should follow the light in the room, not the colour in the photograph. A north-facing kitchen gets cool, grey light, so a warm white or a warm greige on the wall units will look right, while a brilliant white with a blue undertone will look cold. A south-facing kitchen gets strong warm light, so cooler colours hold up better and whites stay white. Our guide to paint colours that make a small room look bigger explains undertones and light reflectance in plain English, and the same rules apply to cabinet colour.
Worktops on a Budget: Laminate, Wrap, and What to Avoid
The worktop is the surface you touch every day, so it has to look right at arm’s length and survive hot pans, sharp knives and standing water. A budget worktop can do both, provided you choose the material honestly.
Modern laminate is the best value worktop for a budget kitchen. It now mimics stone, wood and concrete convincingly at a normal viewing distance, and a good laminate worktop lasts 20 years or more with ordinary care. Choose a matt or lightly textured finish rather than a high gloss one, because gloss shows every mark and every crumb. Choose a square or slightly rounded edge rather than a thick imitation stone edge, because a thick edge is where the imitation usually gives itself away. Budget 100 to 500 pounds for laminate in a small kitchen, fitted yourself or by a joiner.
Vinyl wrap over an existing laminate worktop is the cheapest option, at 0 to 100 pounds, and it is worth considering when the worktop is sound but the colour is wrong. Clean the surface thoroughly, apply the wrap with a smoothing tool to push out air bubbles, and seal the edges and the sink cut-out carefully, because water getting under the edge is what lifts it. Wrap suits a short-term refresh, such as a rented home or a kitchen you plan to replace in a few years. It does not suit a worktop next to a hob, where heat will lift it, or a sink area that is constantly wet.
What to avoid is a cheap imitation that tries too hard. A thin stone-effect laminate with a high gloss finish, a worktop with a fake marble pattern printed in the wrong scale, or a brightly coloured worktop chosen to make a statement will all date faster than a plain, honest material. A plain light wood effect, a pale stone effect or a simple dark grey will outlast a fashionable pattern, and it will let the cabinet colour and the styling do the talking.
If the worktop has a damaged section, you do not always need to replace the whole run. A chopping board or a large serving board over the damaged area, a new sink or hob cut into a fresh section, or replacing just one run in a matching laminate can buy years. But if the damage is swelling from water at the sink, replace that section properly, because swelling spreads.
Handles, Taps and the Small Swaps That Read as New
Handles and taps are the jewellery of a kitchen. They are small, they are touched constantly, and changing them is the fastest way to make old cabinets look new. This is the best 0 to 100 pound spend in the whole guide.
Handles should be chosen by feel as well as by look. A cup pull on a drawer, a bar handle on a door, or a simple round knob all work, but they should be consistent through the room. Mixing three handle styles in one kitchen looks like a mistake, not a design choice. Measure the fixing centres on your existing handles before ordering, because handles are sold by the distance between the two screw holes, usually 128 mm or 160 mm in the UK, and a handle with different centres means drilling new holes in every door.
Finish matters more than shape. Brushed brass, matt black, chrome and brushed nickel all work, but they must match the tap and the other metal in the room. A brass tap with chrome handles and a stainless steel sink will look like three separate decisions. Pick one metal and repeat it: tap, handles, light fittings and any visible fixings. If the budget only covers one change, change the tap first, because it is the largest metal object in the room and the one you use most.
The tap is also where function meets design. A single-lever mixer tap with a swivel spout suits most British kitchens and is easy to use with wet hands. A pull-out spray tap is useful if you wash a lot of vegetables or fill tall pots, but it costs more and needs a deeper sink to be worth it. Avoid a tap that is too tall for the sink, because it will splash, and too short, because it will make filling a kettle awkward. Budget 100 to 500 pounds for a good quality mixer tap, fitted by a plumber if the pipework needs changing.
One more small swap with a big effect: the sink. A tired stainless steel sink with scratches and limescale can be cleaned and polished back to life with a proper sink cleaner, and a new waste and plug set costs very little. If the sink is genuinely worn, a like-for-like replacement in the same cut-out is a 100 to 500 pound job and does not need a new worktop.
Lighting: The Cheapest Transformation in the Room
Lighting changes a kitchen more than any other single spend, and it is the change people most often leave until last. A kitchen lit by a single ceiling light looks flat and shadowy, however good the cabinets are. The same kitchen with three layers of light looks designed.
Start with task lighting, because a kitchen is a working room. Under-cabinet LED strips are the single best buy in a budget kitchen: they light the worktop where you chop and read recipes, they cost 0 to 100 pounds for a small kitchen, and they fit with adhesive backing or a few screws. Choose warm white LEDs, around 2700K to 3000K, because cool white strips make food look grey and the room feel clinical. Fit the strip at the front edge of the wall unit, not the back, so the light falls on the worktop rather than on the wall.
Add a pendant or two over the worktop or the table, if the room has one. A pendant gives the kitchen a focal point and a pool of warm light at eye level, which is what makes the room feel welcoming in the evening. One pendant suits a small kitchen; two in a row suit a longer run or a kitchen-diner. Keep the pendant low enough to see, around 75 to 90 cm above the worktop, and put it on a dimmer so it can be bright for cooking and low for eating.
Keep the ceiling light, but use it less. A ceiling light on full brightness flattens everything and shows every mark on the cabinets. In the evening, the under-cabinet strips and the pendant should do the work, with the ceiling light dimmed or off. If the ceiling light is a bare bulb or an old fluorescent fitting, replacing it with a simple flush fitting or a small pendant is a 0 to 100 pound job that changes the room at once.
The three-layer idea, ambient, task and accent light, is explained in full in our guide to layered lighting design for a living room. The principles are the same in a kitchen, only the task layer matters more and the accent layer is usually a picture light, a shelf light or the glow from a glass-fronted cabinet.
Splashbacks and Walls: Tile Less, Paint Smarter
A tiled splashback is one of the most expensive things in a budget kitchen when it is done badly, and one of the cheapest when it is done well. The trick is to tile less and choose better.
Tile only the wet zones: behind the hob and behind the sink. Those are the two places where water, grease and heat actually hit the wall. Everywhere else, a scrubbable kitchen paint in eggshell or satin will do the job, and it costs a fraction of tiling. A full wall of tiles in a small kitchen is not only expensive, it makes the room feel smaller and harder, because it adds a hard, reflective surface where a painted wall would be soft.
For the splashback itself, a single row of plain tiles, a sheet of toughened glass, an acrylic panel or a laminate splashback panel all work, and all cost less than a feature tile across the whole wall. Peel-and-stick tiles are the cheapest option and suit a rented home or a short-term refresh, provided they are fitted on a clean, flat surface and kept away from direct heat behind the hob. Toughened glass is the easiest to clean and the most durable, but it costs more and must be measured and ordered to fit.
Paint choice matters as much as tile choice. Kitchen paint should be scrubbable, because the wall beside the hob and the sink will be wiped often. A matt emulsion will mark and will not survive cleaning; a kitchen paint in a soft sheen will wipe clean and will look better for longer. The colour should be the same warm white or pale tone as the wall units, or one step darker, so the wall and the cabinets read as one surface rather than two competing ones.
If the kitchen has a window over the sink, keep the wall around it clear. No tiles, no shelves and no clutter on the sill. The window is the brightest surface in the room, and anything that blocks it makes the kitchen darker and smaller.
Flooring: Vinyl Plank and Other Budget Floors That Look Designed
Kitchen flooring has to survive water, dropped pans, muddy boots and daily mopping, which rules out most of the pretty options. The budget choices that actually work are vinyl plank, sheet vinyl and, in a dry kitchen, a good laminate.
Vinyl plank is the best value floor for a budget kitchen. It clicks together like laminate, it is waterproof, it is warm underfoot, and it now comes in wood and stone effects that look convincing at floor level. Typical prices quoted start from around 7.99 pounds per square metre for a basic plank, and a small kitchen can be floored for 100 to 500 pounds including underlay. Lay the planks in the same direction as the longest wall, or towards the window, so the eye follows the length of the room rather than across it.
Sheet vinyl is cheaper still and suits a rented home or a very tight budget, because it is one piece with no joints for water to get into. Choose a plain or lightly patterned design rather than a loud imitation tile, because a loud pattern will fight the cabinets and the splashback. A plain warm grey, a pale wood effect or a simple stone effect will sit quietly under everything else in the room.
What to avoid is a floor that tries to be the feature of the room. A brightly patterned tile, a high gloss floor or a dark floor in a small north-facing kitchen will dominate the room and make everything else look wrong. The floor should be the quietest surface in the kitchen, not the loudest. It should also be the same floor, or the same tone, as the adjoining room where possible, because a change of floor at the kitchen door chops a small home into smaller pieces.
Check the floor level before you lay anything. A kitchen floor that is not level will show in the gaps between planks and in the way doors swing. If the old floor is uneven, a self-levelling compound or a new plywood subfloor is a 100 to 500 pound job that is worth doing before the new floor goes down, not after.
Small and Galley Kitchens: Layout and Colour Rules That Work
Small kitchens are the hardest to design and the easiest to get wrong, because every decision is visible and there is nowhere to hide a mistake. They are also the kitchens where a design-led approach pays off most, because a few good decisions change the whole room.
The first rule is to keep the worktop clear. A small kitchen with a clear worktop looks twice as big as the same kitchen with a toaster, a kettle, a bread bin, a knife block and a fruit bowl on it. Move the toaster and the kettle into a cupboard if there is room, or onto a single shelf, and keep only the one item you use every morning on the worktop. The clear worktop is not a styling choice. It is a space choice.
The second rule is to use colour to widen the room, not to decorate it. In a galley kitchen, the two long walls are the problem. Painting the long walls pale and the short end wall one step darker makes the room feel wider and shorter, which is the opposite of the corridor effect. A deep blue on the base units with lighter walls, as several UK budget guides recommend, works in a small kitchen for the same reason: the dark base grounds the room while the pale upper half keeps it light. Our guide to bedroom colour schemes for small bedrooms covers colour by light direction in detail, and the same thinking applies here, because kitchens in terraced houses are often north-facing and need the same warm, light-reflecting palette.
The third rule is to choose storage that fits the room rather than the catalogue. A tall larder unit in a galley kitchen will block the light and the walkway. A shallow wall unit, a narrow pull-out larder or a single open shelf will hold almost as much and will not dominate the room. Measure the walkway between the two runs in a galley kitchen: 90 cm is comfortable, 75 cm is workable, and anything less means the runs are too deep or the room is too narrow for two runs at all.
The fourth rule is to make the most of the end of the room. In a galley kitchen the end wall, usually the window wall, is the natural focal point. A small shelf, a picture or a single open shelf with three or four objects will give the eye somewhere to rest. A cluttered end wall, or a fridge pushed into the end of the galley, will make the room feel like a passage rather than a room.
Open Shelving and Storage: Display Rules That Keep It Calm
Open shelving is the most photographed idea in budget kitchens, and the most likely to go wrong in real life. It works when it is treated as display, not as storage, and it fails when it becomes a place where everything in the kitchen ends up.
Remove one cupboard door, or replace one wall unit with a single open shelf, and see how it feels before you commit to more. A single open shelf with everyday crockery, a few glasses and a plant will make the kitchen feel open and personal. Three open shelves full of mismatched mugs, old tins and cleaning products will make it feel cluttered and unfinished.
The display rules are simple. Group similar things together: all the white plates on one shelf, all the glasses on another. Leave empty space, at least a third of each shelf, so the objects have room to breathe. Keep the everyday items at hand height and the decorative items higher up, so you are not reaching for a vase every time you want a plate. And keep the colour palette of the displayed items to two or three colours that match the kitchen, so the shelf reads as part of the design rather than a jumble.
Closed storage still matters, and it should be planned first. The items that need a door are the ones that look untidy: food packets, cleaning products, baking trays, small appliances and the things you use once a month. The items that can live on display are the ones that look good: plates, bowls, glasses, a wooden chopping board, a jar of pasta. If you cannot tell which category an item belongs to, it belongs behind a door.
Inside the cupboards, a few cheap organisers will do more than a new cupboard. A pull-out shelf in a deep base unit, a rack on the inside of a cupboard door for spices, a drawer divider for cutlery and a stackable shelf for plates will make a small kitchen feel bigger, because you can find things without emptying the cupboard onto the worktop. Budget 0 to 100 pounds for organisers, and fit them before you buy anything else for the kitchen.
Styling a Budget Kitchen: The Finishing Layer
Styling is the last layer, and it is the cheapest. It is also the layer that makes a budget kitchen look finished rather than just renovated. The rule is restraint: three or four deliberate objects, not a shelf full of things.
Start with the worktop. One wooden chopping board leaning against the splashback, one jar or canister, and one plant is enough. A trailing plant on top of a wall unit, or a small herb pot on the windowsill, will add life and colour without costing anything. Avoid fake plants, which look fake at arm’s length, and avoid a collection of small objects that have to be moved every time you wipe the worktop.
Add one piece of art or one framed print, hung at eye level on the one wall that is not covered in cabinets. A kitchen is a working room, so the art should be simple and easy to clean: a framed print behind glass, a small mirror, or a single tile with a pattern you like. Do not hang art behind the hob, where it will get greasy, or above the sink, where it will get splashed.
Finish with textiles, which are the softest layer in a hard room. A tea towel in a colour that matches the cabinets, a simple blind or a half-cafe curtain on the window, and a small rug or runner in front of the sink will warm the room and make it feel like a room rather than a workshop. Choose textiles that can be washed, because kitchen textiles get dirty, and avoid a rug that slides on a vinyl floor.
The test for styling is simple: take a photograph of the kitchen on your phone. If your eye goes to the objects, there are too many of them. If your eye goes to the room, the styling is right.
Mistakes That Waste a Kitchen Budget
The most expensive mistake is spending on the wrong layer first. New handles on cabinets that need painting, a new tap in a kitchen with no task lighting, or a beautiful splashback in a kitchen with the wrong layout will all disappoint, because the layer underneath is still wrong. Follow the order: layout, colour, finishes, lighting, storage, styling.
The second mistake is buying a single expensive item instead of several good ones. One designer tap in a kitchen with tired cabinets and no under-cabinet lighting will look like a mistake, while a mid-range tap, new handles, LED strips and a painted cabinet will look like a designed room for the same money. Spread the budget across the layers.
The third mistake is copying a photograph without checking the room. A dark green kitchen with brass handles looks wonderful in a large kitchen with a south-facing window and a 3 metre ceiling. In a small north-facing galley kitchen it will look dark and cramped. Always test a colour on the wall in your own light, in the evening under the lights you will actually use, before you commit to it.
The fourth mistake is ignoring the ceiling. A kitchen ceiling with old paint, a stained patch or a fitting that does not suit the room will undo good work everywhere else, because it is the largest surface you see when you walk in. A fresh coat of white ceiling paint and a simple fitting cost very little and should be part of every budget makeover.
The fifth mistake is buying everything from one place on one day. A kitchen designed in a single shopping trip looks like a showroom, because everything matches too neatly. Buy the big items first, live with them for a week, and then choose the handles, the textiles and the styling. The room will tell you what it needs once the big decisions are in place.
A Worked Example: Three Budgets for a Small Terraced Kitchen
To make the bands concrete, here is what each one buys in a typical small kitchen in a Victorian terrace: a galley or L-shape of around 8 square metres, with the layout kept and the appliances reused.
At 0 to 100 pounds, you can paint the walls in a warm white, swap the handles for a matching set, fit under-cabinet LED strips, add a chopping board and a plant, and buy a tea towel and a small rug. The kitchen will look cleaner, brighter and more deliberate, and the work is a weekend.
At 100 to 500 pounds, you can add painting the cabinets in a two-tone scheme, a new mixer tap, a splashback behind the hob and the sink, and a vinyl plank floor. The kitchen will look like a different room, and the biggest visible surfaces, cabinets, worktop area, floor and tap, will all be new.
At 500 to 2,000 pounds, you can add a professional spray finish on the cabinets, a new laminate worktop, replacement doors on the worst units, a pendant light and a new sink. At the top of this band the kitchen will look newly fitted to anyone who walks in, even though the carcasses, the layout and the appliances are all original.
None of these bands includes moving plumbing or gas, replacing the appliances or changing the layout. That is the point. The design-led makeover is a different project from a full renovation, and it is the right project for a kitchen that is sound but tired.
Frequently Asked Questions
How can I redesign my kitchen on a budget in the UK?
Keep the layout and the appliances, and spend in this order: layout, colour, finishes, lighting, storage, styling. Painting the cabinets, changing the handles and taps, fitting under-cabinet LED strips and replacing the worktop with laminate will transform most kitchens for 3,000 to 8,000 pounds, and often for far less. The single biggest saving is not moving the sink, hob or gas point.
What is the cheapest way to make a kitchen look new?
Paint the cabinets and change the handles. A painted cabinet with a new handle reads as a new cabinet at a fraction of the cost, and the work is mostly preparation. Under-cabinet LED strips are the next best spend, because they change the light in the room for under 100 pounds.
What colour makes a small kitchen look bigger?
A pale, warm palette on the walls and wall units, with a darker colour only on the base units, makes a small kitchen feel wider. In a north-facing kitchen choose a warm white with a yellow undertone, because a brilliant white will look grey in cool light. Avoid a dark colour on all four walls, and avoid a high gloss finish, which shows every mark.
Should I paint my kitchen cabinets or replace the doors?
Paint if the doors are sound and you like their style, because it is the cheapest option and a good kitchen paint will last for years. Replace the doors if they are damaged, warped or a style you dislike, because replacement doors in standard 500 and 600 mm widths fit most carcasses and cost roughly 55 to 95 pounds each. A professional spray finish, roughly 500 to 2,000 pounds, is worth paying for if the cabinets are the main feature of the room.
Is open shelving a good idea in a small kitchen?
One open shelf works well, because it makes the room feel open and gives you somewhere to display the crockery you actually use. Three open shelves usually fail, because they become storage for everything and the kitchen looks cluttered. Keep at least a third of each shelf empty, group similar items together, and keep the untidy things, food packets, cleaning products and small appliances, behind closed doors.
How much does a budget kitchen makeover cost in the UK?
A cosmetic makeover typically costs roughly 3,000 to 8,000 pounds, covering painted or replaced doors, a new worktop, handles and taps, lighting, a splashback and flooring, with the layout and appliances kept. A modest renovation is roughly 5,000 to 8,000 pounds, and a full fitted kitchen is 12,000 pounds and upwards once labour and worktops are added. Keeping the layout and reusing appliances typically saves roughly 3,000 to 5,000 pounds compared with a full renovation.